The front fork of a bicycle is not only a connecting element that is located between the frame and the front wheel. It is an integral part of the design of the bike, on the serviceability of which depends the comfort during the ride, as well as the safety of the rider. Moreover, on some models (in particular, MTB) fork plays the role of the main shock absorber, levelling some of the vibrations, reducing the load on the hands and reducing the impact on the moving parts and the frame. Consequently, the element in question requires periodic attention from the owner.
Repair of the fork involves its disassembly, adjustment and possible replacement of some components. Is it possible to cope with this task independently, without recourse to an experienced technician? Sure – you’ll need some time, a couple of tools, and our instructions.
Why you need to dismantle and remove a bike fork
Of course, so easy to get into the complex nodes and mechanisms of the bike is not necessary. Without a special need to disassemble the running parts is not worth it. But there are a number of cases where it does have to be done:
- replacement of the unit, bearings or seals;
- preparing the bike for the beginning of the new season, when you need to clean and lubricate all the mechanisms;
- alignment of the steering tube.
Repair of the front fork involves the replacement of some components (washers, bearings, oil seals, dampers, springs). But periodically disassemble the fork just to clean the component and apply fresh lubricant to it.
How do you know if a bike fork needs attention from the owner? There are a number of signs that tell you it’s time for repair:
- The appearance of a knock while riding;
- the fork is jammed and can’t be adjusted;
- obvious signs of bearing wear;
- creaking (symptom of lack of lubrication)
- turning or heavy stroking of the handlebar;
- cracks on the “legs” and “pants”.
Important information! Experienced masters on repair of bikes recommend to clean and grease “legs” in glands each time when the bike is sent for wintering. It is also advisable to completely change the oil in the forks every year.
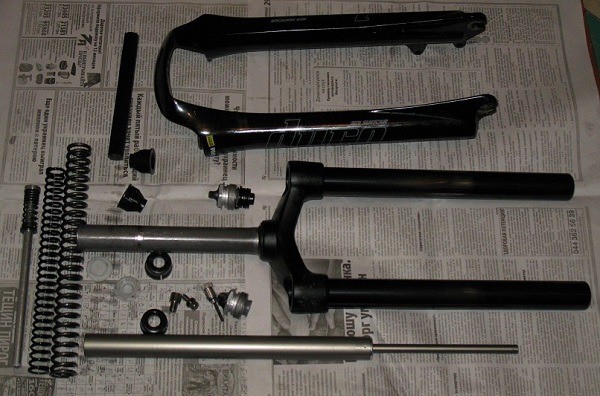
How to Disassemble a Bicycle Fork
To disassemble the bike fork with shock absorber, it is necessary to make a number of manipulations: to prepare a place for work and the necessary tools, create, so to speak, an atmosphere and allocate a few hours in his busy schedule, in order to perform everything correctly and accurately.
You can, of course, take the bike to a knowledgeable person in this matter and not to panic about it, but this way you deprive yourself of the opportunity to further explore the mechanisms of bicycle construction.
Tools
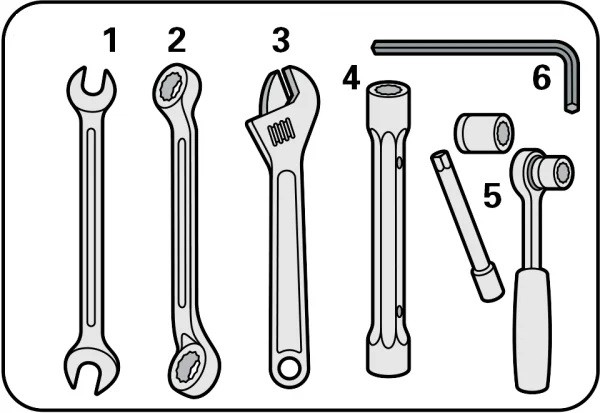
Any specific devices you will not need. Everything you need to disassemble the fork, can be found in almost any garage. These are:
- Screwdrivers (you will need plus and minus screwdrivers).
- Pliers.
- Lug wrench and wrench.
- Allen wrench.
- A flat sharp object.
- Hammer.
Prepare in advance a clean, dry and unnecessary rag for cleaning the mechanism, as well as a lubricant. If you have further plans to go to the movies or a cafe with friends – prepare gloves, because it will be difficult to wash hands.
Step by step instructions
Everything you need for disassembly and subsequent assembly of the fork is prepared – you can proceed. So that you can do everything correctly, we have prepared detailed instructions on how to remove the fork from the bike with your own hands:
- First you need to put the bike with the wheels up. Make sure that the stability of the bike at the maximum level – for this you can secure it with additional fasteners or ask someone to hold the bike.
- To release the rim brakes, you have to release the clamping bar.
- Now you must remove the front wheel along with the brake discs. At this stage, you can also remove the fenders along with other attachments.
- Now you need to return the bike to its and your usual position, and then remove the fork from the cup.
- Next, you need to unscrew the side bolts, which are on the handlebar stem, and then completely unscrew the handlebar pin fasteners.
- Now carefully take out the handlebar from the front fork and immediately wipe the exposed parts with a clean rag.
- Next, any sharp object comes in handy (you can use a screwdriver or office knife), with which you should pick up the retainer (metal washer) above the cup.
- Using the same sharp tool you need to press out the gasket under the washer. Once it is away from the edge of the cup, pull it out by hand.
- Now it is necessary to lift the frame and as carefully as possible pull the fork from the bottom so as not to damage the mechanism and not to lose the bearings.
- The next step is to separate the crown from the stem. To do this, knock out the connecting ring with a small hammer.
And now, armed with a flat sharp object and a hammer, you need to separate the ring from the edge of the front fork. In fact, that’s all – the dismantling process can be considered complete.
The same method can be used to remove the fork from a mountain bike, road bike, hardtail and any other model. When all manipulations with maintenance and repair are finished, there is quite a logical question: “And how to put everything back?” Do not panic – now we will tell you.
How to assemble and put the plug back
After you have removed the element under discussion, carefully inspect the bearing ring. Ideally, there should not be any hint of damage on it. Otherwise, you will have to replace the part with a new one. Now you can put the fork back. The sequence of operations is as follows:
- Put the ring where the junction of the front fork connects to the steering column.
- Firmly grip the ring with the gas wrench at the top.
- Armed with a small hammer and making soft strokes on the jaws of the wrench, try to press the ring evenly. You should be guided by the sound: if it is dull – continue to make accurate strokes, as soon as the sound is resonant – the part is in its place.
- Now lubricate the surface of the stopper (you can use a special compound, or you can use an ordinary bexol or lithol-24).
- Carefully lay the bearing, so that its balls are located at the top. You can also apply a small amount of grease to this component. Do not forget to put a sealing washer under the bearing.
Now carefully insert the stem into the cup and go back to the algorithm for removing the front fork – the whole sequence should be repeated in reverse order.
How often should the fork be serviced
The frequency of fork maintenance depends directly on how you ride and on what roads you most often pass your routes. If you ride on clean and smooth city roads, do not jump over curbs and try to use your bike as carefully as possible, it is enough to service the front fork once every two years.
But if your paths are rich in dust, dirt, small stones and other “charms”, the frequency of maintenance should be increased. Bicycle repairmen recommend that:
- after every 700 km you should disassemble, clean and lubricate the oil seals (replace consumables if necessary);
- Every 4,000 km, completely overhaul the front fork.
Of course, these are general recommendations. If there are any alarming symptoms (we spoke about them earlier), it is necessary to penetrate into the mechanism as soon as possible and find out the reasons of malfunction.
Recommendations
It is worth focusing on the peculiarities of the lubricant. Many give preference to the grease “Lithol-24”, despite the fact that this composition can have a negative effect on the aluminum components of the bike when it gets wet. Whether this is true or not, it is impossible to say for sure, since there were no complaints on this subject from cyclists. “Lithol-24” demonstrates good resistance to radical temperatures: it does not thicken in the cold and does not liquefy in the hot summer.
Some people use car oils, as well as compositions designed for sewing machines. As life practice shows, the regular use of such compositions (this, by the way, also applies to paraffin grease) affects the work of the shock absorber.
Conclusion
Dismantling and reassembling the front fork is not particularly difficult. Even an inexperienced technician can cope with this task, if he will strictly follow the instructions. Preparing the bike for the season involves a wide range of manipulations with the main nodes and mechanisms, so the disassembly of the discussed element can be timed to coincide with general preventive measures. This will allow you to avoid serious problems and reduce the cost of repair work in the future.


