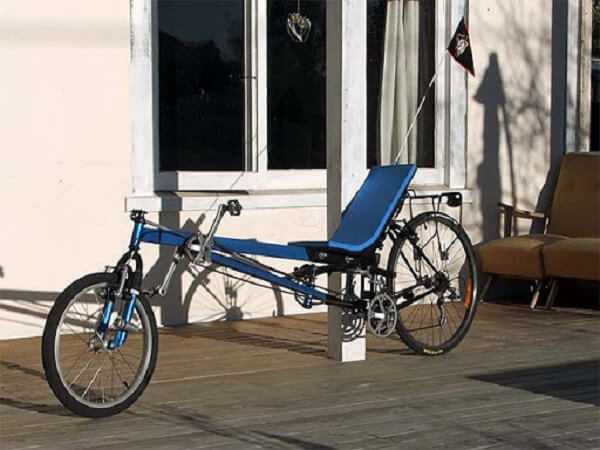
Have you ever seen a Ligerad? It is a unique bicycle design, the distinguishing feature of which is the most comfortable position of the rider. The cyclist controls the vehicle while lying in the seat. Today we will tell you how to make a Ligerad with your own hands, and what is good about this bicycle design.
Does it make sense to make a Ligerad with your own hands
One of the most significant disadvantages is the high cost of the discussed model. The number of bicycles of this type is very limited.
The budget model of such a plan costs about 100 thousand rubles. The cost of the most expensive Ligerad–what-it-is–types-and-benefits-of-recumbent-bikes is even scary to imagine – in the region of 1 million rubles. It is clear that a mere mortal cannot afford such a design. But if a person has a technical mindset, design skills and at least a sketchy idea of how to build a Ligerad–what-it-is–types-and-benefits-of-recumbent-bikes-trike, then it is a matter of doing very little – making a drawing and assembling a model that is comfortable for travel.
Moreover, such a design has a lot of advantages:
- it is incredibly comfortable. Yes, it is much more comfortable to ride lying down than the standard way;
- it is much more practical when it comes to long distances;
- it is at least unusual.
To assemble a Ligerad bike with their own hands is quite realistic. Especially when there are like-minded people who can give some sensible advice. And you should start with a detailed plan, presented on paper.
Drawing the blueprint
You can’t do without a graphic drawing. The design of a Ligerad–what-it-is–types-and-benefits-of-recumbent-bikese is quite complex. When creating it, you need to take into account a lot of nuances, which you can’t implement as you go along. Accuracy and detail are important here – even a minor error can lead to more serious problems.
Therefore, you need to start making a Ligerad–what-it-is–types-and-benefits-of-recumbent-bikese with your own hands with a drawing. If you have technical drawing skills – good. If not, you can use ready-made versions, which, by the way, can be refined at will.
Materials and tools
When the drawing is ready, you need to collect the necessary components that will be needed for the construction of the “lying” bicycle. The following algorithm will help you to assemble a unique design, which will be worthy of attention.
To assemble an aesthetic and functional Ligerad–what-it-is–types-and-benefits-of-recumbent-bikes, you will need two standard bicycles. It is very good if one of them will be represented by a mountain model with 26-inch wheels. It will give the future Ligerad–what-it-is–types-and-benefits-of-recumbent-bikes all of its rear components – this applies to the triangle, carriage, cranks and speed derailleurs. And it will also need to take the steering rack along with the steering column, the stem and the fork tube.
An additional donor can be the same mountain bike model, but with 20-inch wheels. From it the future vehicle will take all the front components plus the carriage with connecting rods.

The most suitable “raw material” – bikes that have a triple drive sprocket, which does not depend on the cranks. Also needed are components such as:
- rectangular metal (steel) tube (3 meters);
- a piece of chipboard for making a chair;
- soft upholstery material for the future bicycle chair;
- steel plate;
- threaded rod (1000 mm);
- a tip for the rod;
- 3 to 5 plastic tubes.
As for tools, you will need everything you need to repair a regular bike, as well as a welder, a set of screwdrivers, wrenches and everything you need to disassemble the bike.
So, we got the theory, let’s get down to the practical part.
Instructions for making a Ligerad with their own hands
Even at the design stage, the owner of the future Ligerad should take into account individual preferences and parameters, so that the future design was adapted to a particular person as much as possible. Therefore, it is important to provide for some nuances.
Assembly of the frame
If the potential owner of the “recumbent” bicycle will be only one person, the frame must be designed for a specific height. If more than one person will be using the Ligerad, the position of the seat should be adjustable.
First, you need to connect the 26-inch wheels to the rear triangle, seatpost and bike carriage. Using a welder, a 130 cm tube should be welded to the seatpost at a 90° angle. This will be the top of the future unit.
Next, you need to cut the carriage with a smaller frame – you will end up with the front carriage of the new frame. Then we attach the lower tube by welding the carriage to a 100 cm long tube.
From the longer frame, we cut the steering rack, then drill and grind a hole in the tube needed to fit the rack into the new design. Tubes welded by gas welding (or electric welding) of different diameters should be connected by making in advance a hole 25 millimeters in diameter in the front carriage in its central part. The upper tube will then have to be inserted into this socket, and the lower tube is welded to the Ligerad–what-it-is–types-and-benefits-of-recumbent-bikese frame.
Now it is necessary to build the back support for the chair. A part of the rectangular section tube needs to be connected to the top tube so that it can hold the top feathers of the rear triangle at the very beginning of the seat tube.
The last manipulation in the frame assembly stage is the connection of the new handlebar stem. It can be taken from a bike that has wheels with a smaller diameter, and welded to the top of the large tube. The elements should be connected at an angle so that the tube is parallel to the plane of the second handlebar.
Transmission
The design features of the future unit involve the use of an intermediate drive, which will get rid of free space near the connecting rods and eliminate unnecessary sagging of the chain. To accomplish this, you will need a well-polished connecting rod borrowed from the triple drive pinion system.
The front connecting rod will need to be fitted with a small drive sprocket. At the time of making the new drivetrain, you will have to adjust the chain, eliminating slack. A steel roller and sprocket from the rear derailleur will help you with this. It will take time to assemble the transmission, but it’s a critical step that should be handled with the utmost responsibility.
Steering
It is desirable to place the handlebars just below the seat, because the extended wheelbase will control the cyclist from afar. In front of the steering lever, which will be located in front of the bike, you can assemble from the steel plate outriggers – this is the arm of the lever. It should be placed on the tube of the front fork.
It will take longer to make the back part. You will need a piece of steel tube, which will need to be cut from the front fork of the second bike, a new mount and an overhang. The last element should preferably be made longer. The stem should be in the handlebar cage. Its upper part is in the lower compartment of the upper tube.
At the same time, you should pay attention to the height of the construction and its components. Steering rod should preferably be made of a rod (diameter should not exceed 1 cm) with two tips. The height-adjusted steering element will then be “hidden” in a plastic tube. The steering link must be placed between the frame and the crank, above the carriage.
Seat
Making a seat can be entrusted to a carpenter, if you have one among your acquaintances. The chair should preferably be made of chipboard, and then upholstered with soft material, which is easy to remove and wash if necessary.
The base of the chair will be attached to the upper tube. The steering device should coincide in height with the location of the cyclist. The Ligerad–what-it-is–types-and-benefits-of-recumbent-bikes’s chair should move easily in all directions (forward and backward). This way it can be adjusted according to the height of the cyclist.
Finally, all that remains is to fix the seat securely to the top feathers of the rear triangle with a few bolts.
Conclusion
Assembling a two- or three-wheeled Ligerad–what-it-is–types-and-benefits-of-recumbent-bikes yourself is not that difficult when you have some skills in repairing two-wheeled vehicles and a technical idea of what the result should be. Armed with the support of a few acquaintances who have experience in garage remodeling, you can create a truly unique unit, which you can later proudly demonstrate to others.


Thanks for providing such detailed instructions on how to make a ligerad-bicycle! This is extremely helpful and informative. I’m sure many people will find this blog post very useful.
This post is super helpful! A great step-by-step guide for making your own ligerad-bicycle. Thank you for the informative and detailed instructions!