A bicycle, like any other vehicle, requires proper care and timely maintenance. Any part can fail at the most inopportune moment. To prevent this from happening, you should constantly inspect and promptly repair even minor failures. But there are malfunctions that can be avoided in advance if the appropriate actions are taken in time.

It is not uncommon for cyclists to have to make adjustments and adjust the speeds on their bikes. This can be due to a recently replaced derailleur or a stretched cable. Regardless of the reason for the resetting, the system will still need to be readjusted.
How to adjust the front derailleur on your bike, what it consists of, and how this part works is described in the material below. By reading it you will be able to install and adjust the front derailleur without the help of professionals.
What it consists of and how it works
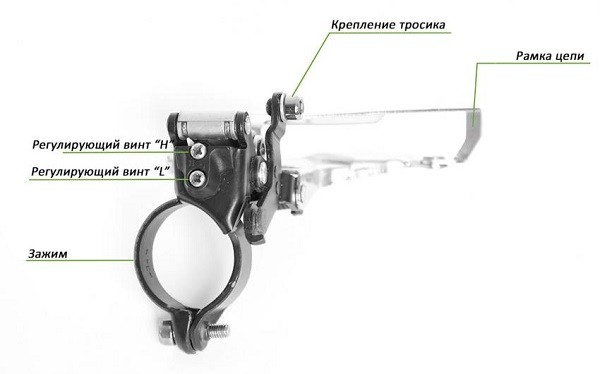
Only it seems that this small part has a simple package, but here every bolt performs an important function. First, let’s understand what comes with the derailleur:
- Clamp – The element that allows you to secure the derailleur to the frame.
- Parallelogram – This is the moving part of the front derailleur, in the form of a spring-loaded part on hinges. The part is shaped like a parallelogram, hence the name.
- The guide frame is the element inside which the chain is placed. It is attached to the parallelogram and consists of two parts: inner and outer.
- The L and H bolts are used to limit the movement of the guide frame.
- Cable attachment bolt – allows you to fix the shifting cable so that the chain can get to the correct sprocket.
The limiting bolts need to be set correctly to avoid the chain slipping off.
How it works
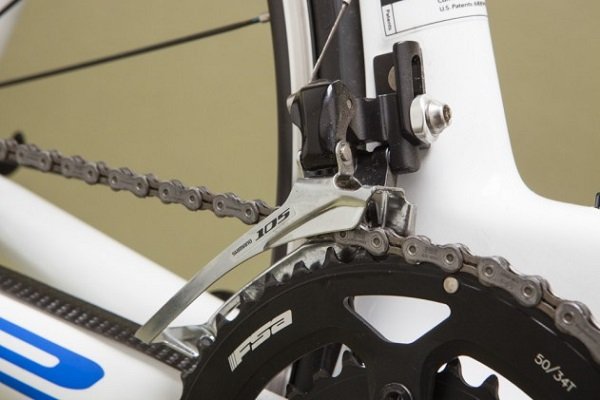
What is a “front derailleur”? It is a steel frame that can move both ways. It connects to the frame of the bike and has simple functionality. The frame starts to move with a cable connected to the handlebars by the shifter. This arrangement allows the frame to move the bike chain from one sprocket to another. There doesn’t seem to be anything complicated. But, if you don’t adjust this part correctly, you won’t be able to change gears. To understand how to adjust the front derailleur on the bike, let’s imagine that the installation is done on the bare frame of the bike.
What you need to do before adjusting
Many factors affect the functionality of this part, so be sure to read the instructions before proceeding with installation or adjustment. It is important to note that there are shifters for 2 and 3 front sprockets. That is, the system may not fit the derailleur.
What steps you need to take before you start setting up:
- Make sure the shifter system is suitable for your front star system. This should be done when installing the newest shifter or having trouble adjusting the old one.
- Don’t forget to check for damage to the system and also do a backlash check. Especially if there have been any falls. Parallelogram or frame backlash can also form. Either have them eliminated or buy a new part for accurate tuning.
- Before adjusting, thoroughly clean any dirt from the part. This will be handy when removing it from the bike frame. After that, it is important to re-lubricate all elements and tune them from scratch.
- Check for continuity, clean and lubricate the cables. It is also important to inspect for broken strands. If you find damage, you will need to replace the cable. It is not necessary to reattach the cable to the derailleur. It should be inserted into the shifting lever on the handlebars and slipped into the jacket, and the attachment itself will occur during shifting.
- If you cut the cable, it may destroy the cable terminator. To easily insert it into the shackle, you can braze the tip with tin. To make it easier, it is recommended to dip the tip in soldering acid and solder it. Make sure that you do not solder too much tin, because this will not allow you to get the cable into the hole properly.
By following these simple guidelines, you can easily adjust your derailleur.
Setting and Adjusting Your Bicycle’s Front derailleur
When the preliminary preparations are done, you can begin to adjust and tune the derailleur. During the process, it is important not to get distracted and to be extremely careful to get it right.
How to properly install a front derailleur on a bicycle
You can think of a front derailleur as being correctly mounted if it has the longitudinal axis of the guide frame parallel to the front chainrings. But the space between the biggest sprocket and the bottom of the outer part of the frame is no more than 2 mm. The chain should be removed because it will help you align the shifter more quickly.
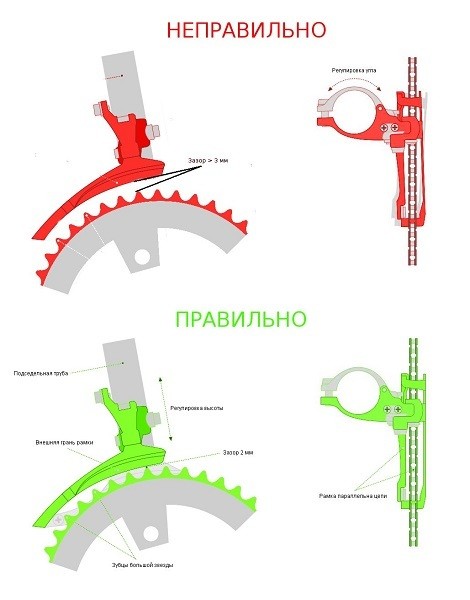
Next, by moving the shifter vertically on the frame, you need to adjust the distance to the biggest star from the bottom of the outer part of the frame. To do this, bend the parallelogram away from the frame and point it toward the large star. Align the frame with the biggest sprocket in relation to each other and make a gap of maximum 2mm between them (to make it easier to arrange this, it is allowed to put a thing of appropriate size between them).
For example, Shimano brand gear shifters have stickers with markings that make it easy to determine the level of its installation in relation to the large sprocket.
After determining the fixing height of the derailleur clamp, we can make a mark, for example with a marker, and lightly tighten the fixing bolt of the clamp.
To adjust the position in relation to the star system of the guide frame axis, the following steps are necessary: loosen the clamp bolt (with the cable set aside) and, while turning the derailleur, make adjustments so that the frame and the front sprockets become parallel to each other. Since the construction is not simple enough and it is difficult to know parallelism by eye, we recommend to orient on a parallelogram or for more confidence glue something like a ruler to the frame with adhesive tape.
Lightly tightening the clamp bolt, re-check the distance between the bottom edge of the frame and the biggest sprocket. It’s also worth checking for parallelism between the longitudinal axle and the front sprockets. After making sure everything was done correctly, you can finally tighten the clamp bolt. Thus, the adjustment of the front derailleur on the Shimano bike or other models can be completed. Next, put on the chain and start adjusting.
All work does not take much time, but requires a clear sequence of actions and attention. Doing everything according to the instructions, you can easily install the part in the right place.
Adjusting the speed selector
To do further work, you should properly position the bike. Hang it by the saddle if possible. But the back wheel should be raised or you can put it on an ironing board (put it through the triangle).
Adjustment is not difficult. Consider the steps:
- We set the lowest speed.
- On the shackle tighten the cable tension adjustment. This is done clockwise to the stop. Return it back 1 to 2 turns. Some instructions do not recommend going back, but practice has shown that if you do it this way, you can make more accurate adjustments in the future.
- Set the lowest speed on the rear derailleur.
- Adjust the L derailleur limiter. Be careful not to let the chain and frame touch during pedaling. If you see that it is necessary to move the frame a little aside from the frame, turn the limiter L clockwise, and vice versa, toward the frame you must turn counterclockwise.
- Determine the location of the cable on the switch and insert it. The cable is tightened in the right place and secured with the fastening bolt. You may need pliers for this.
- The next step is shifting the gears. Put the rear part on the smallest sprocket, and the front part on the largest one.
- Next, proceed to adjusting the limiter H. When adjusting, make sure that the outer part of the guide frame is as close to the chain as possible, but does not rub it during rotation. Accordingly, to move the frame away from the frame, tighten the bolt counterclockwise, and when moving toward the frame, clockwise.
- Next, we set the 5th speed in the rear gear and, by turning the pedals, change the speeds. To do this, use the front derailleur from 3rd to 1st and then back to 3rd again. This should be repeated several times.
- Test the bike on the road. Choose a road that is flat and without bumps or dips.
This is how you adjust the front gear shift on your bike. By following all the steps, you will be able to make the adjustment without much difficulty.
Possible malfunctions in the adjustment process
Adjusting the front derailleur on Shimano bikes and other models can be accompanied by some malfunctions:
- One of the most common problems cyclists encounter is that the front derailleur doesn’t fit the system. There are 3 types of derailleurs on sale. They differ in the location of the cable pull. Depending on the location, the linkage can be top, bottom or universal. In addition, each derailleur is designed for a specific tooth system. To make sure you don’t make a mistake in your choice, you should remember which one you have, or take an old part as a sample before you buy.
- Another difficulty a cyclist may encounter is when adjusting the gear shift on the bike, there is chain rubbing against the frame. This problem can occur for a number of reasons: uneven sprockets, improper installation of the system. To fix it, you should carefully check the parallelism of the installation, make sure that there is no deformation of the stars and that they do not change axis during rotation.
- It is not uncommon for cyclists to notice that the chain rubs against the frame at speed 3-1. This problem can occur when the chain is diagonally positioned. If the chain is not positioned correctly, it will stretch at best, and at worst the front derailleur will break.
To prevent problems, it is worth remembering to decrease pressure on the pedals when shifting.
Conclusion
Thanks to these recommendations, the adjustment of the front derailleur of Shimano Tourney bicycle and other models can be performed at home. The main thing is to be attentive, to do everything step by step, take your time, and do not miss important points. A little more difficult will be at the stage of installing the system on the bike frame, but it is doable. Follow the instructions no matter what manufacturer you choose, and everything will work out. Before you start installing or setting up the derailleur, read it in detail.


Great post! It’s so helpful to have a step-by-step guide on how to adjust the front derailleur on a bike. I appreciate how thorough and informative this article is, making it easy for even beginners to understand. Thanks for sharing!