Cycling should be comfortable and enjoyable for the traveler. In order to enjoy the ride as much as possible, it is important to ensure comfortable conditions. To do this, you should adjust the handlebar and seat height on your new bike after purchase.
So the cyclist will find the most comfortable position and will not feel pain in the muscles during the ride. Experienced cyclists know firsthand about discomfort in the back, neck and arms. This is why they attach great importance to how to correctly adjust the handlebar height on the bike.
Professional cyclists adjust the low handlebar height relative to the saddle on the bike. Because the lower the center of gravity is, the greater the grip on the road and the greater the speed the athlete can achieve on the course.
Different Handlebar Positions

Before you know how to properly adjust the handlebar on a bicycle, it is worth familiarizing yourself with its types of positioning and choose the most comfortable option for riding.
Types of positioning:
- The handlebar and saddle are at the same height. The standard option for amateur cyclists.
- The handlebars are placed lower than the saddle. With this arrangement, the athlete achieves maximum speed.
- The handlebars are above the saddle. Perfect for girls, children and the elderly on long rides.
- Rudder is placed perpendicular to the front wheel. This position is used by professional athletes in competitions and training.
It is important enough to periodically adjust the height of the handlebar on a child’s bicycle. Over the winter period, the child grows up, so the previous settings may no longer fit him. Every 20 centimeters of growth already requires a change.
You should adjust the handlebar height on mountain bikes, road bikes, city bikes and trikes.
In addition to changes in height, adjustment of the handlebar in relation to the wheel is carried out in cases of gaps or gaps in the bike’s handlebars. That is, when there are malfunctions in the component parts.
Why you need to adjust the height
Before determining what the handlebar height on a bicycle should be, it is worth taking into account the riding style, the height of the person, as well as the most comfortable position of the body.
First, properly adjusting the handlebar height on both mountain and road bicycle models is necessary to ensure comfort. Body aches and muscle fatigue can mar any upcoming ride. Therefore, it is worth taking a responsible approach to this issue.
Second, the riding style of the bike affects how to adjust the handlebars to the right height.
- For high speed enthusiasts and for rugged, mountainous terrain, it’s a good idea to lower the handlebar below the seat. This will increase the grip on the road surface, which in turn will make it easier for cyclists.
- For long journeys and everyday walks in the city, it is better to raise the handlebar above the saddle, or adjust it to one level. This position will provide the most comfortable conditions.
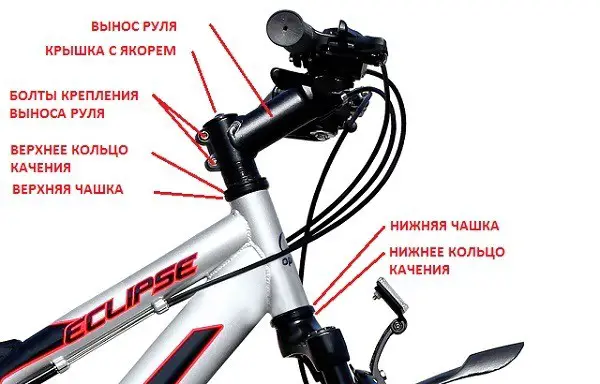
There are several ways to adjust the handlebar stem on your bicycle depending on the type of handlebar. Types of steering columns:
- Threaded column;
- Unthreaded column;
- Semi-integrated column;
- Integrated modification.
Let’s take a closer look at each type, as well as the algorithm for adjusting the steering wheel height.
Threaded column
Most often such a design is found on Soviet models, as well as on modern brands such as Stels or Stern. Changing the height on bikes with such a column is easier than on other types. To adjust the handlebar height on a Stels or Stern bike with a threaded handlebar, follow the step-by-step instructions:
- Secure your bicycle for easy follow-up.
- Unscrew the top stem bolt, but do not pull it all the way out of the hole.
- Turn the handlebar sideways and try to change the height of the handlebar. If it does not work, use a hammer. Tap the handlebar a couple of times near the bolt to get the wedge out of its “usual place”.
- Adjust the handlebar to the correct height. Be careful! The stem should not be higher than the marking on it. This is usually marked as “Stop“, “Maximum” or other marks.
- Re-tighten the bolt. Make sure that all parts are securely in place before you drive.
Unthreaded column
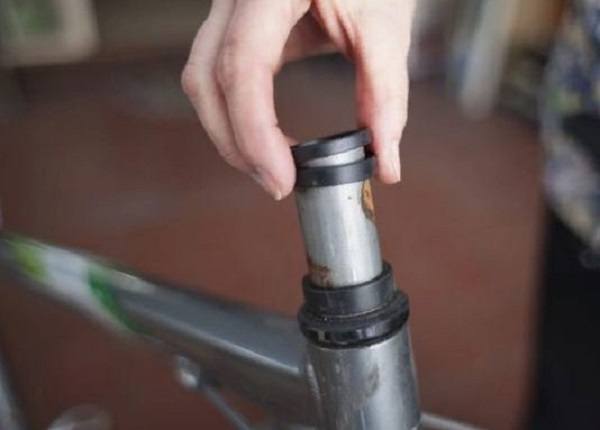
On models with a threadless column, the height level can be adjusted using special spacer rings that vary in width from 5 to 30 millimeters. To increase the height, add additional rings. To reduce the level, remove the extra ones.
Algorithm for changing the handlebar height on bicycles with a threadless column:
- Secure the bike so it stands flat and doesn’t go anywhere.
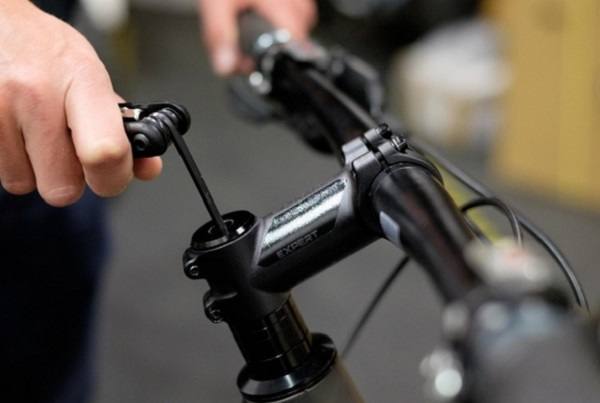
- Unscrew and remove the bolt (“anchor bolt”) from the top cover as well as the mounting bolts that are on the sides.
- Carefully remove the handlebar and stem to get to the spacer rings.
- Next, remove the extra rings if you want to reduce the height. Or add new ones if you want to increase the level. If you don’t have extra rings in the kit, purchase them from a specialty store. You can also use an extra spacer in place of the rings.
- Reinstall the stem and handlebar and screw in the mounting bolts on the sides. Fix the top cover with the bolt that was removed (“anchor”).
Make sure that the stem is installed correctly. If necessary, loosen the bolts and adjust the handlebar on the bike straight against the wheel as it was before the height change.
To check that the stem is securely installed, do the following
- Apply the front brake.
- Turn the stem and handlebar in different directions.
- If the fork stem inside the headset moves, unscrew the side bolts a bit and tighten the top bolt (the “anchor”) a bit more. This will eliminate the gap between the spacer rings. After that, tighten the side bolts back up.
Before you ride your bike, make sure that all parts are fastened securely enough so that they will not move when you ride.
Semi-integrated Column
The design of the semi-integrated steering column is similar to the threadless column. The main difference is that the upper and lower bearing cups are inside the frame. This means that there are virtually no protruding elements in this design. Therefore, the handlebars can be lowered to a fairly low level.
Such models are used by athletes on long distances. Because the low level allows you to develop a high speed, and also provides better aerodynamics.
Since the manufacturing process of the semi-integral column in production is more complicated than other types of columns, the cost of bike models with its use is much higher.
To adjust and change the handlebar height, use the same method as for a threadless steering column.
Integrated modification.
Another type of threadless column. Compared to the semi-integrated model, the integrated model is a more advanced version. The design is made without cups and the bearings are directly mounted in the frame.
Only industrial models are used as bearings, which fit into grooves specially made for them. Due to the high level of complexity and cost, such steering column models are very rare.
The advantage is the possibility of the lowest possible position of the handlebars. A significant disadvantage is the difficulty of independent repair of the design.
To change the height level, you should use the same algorithm of actions as for the threadless steering column.
Adjusting the angle and reach
The stem angle can also be adjusted to suit the bike’s owner. The correct handlebar height and angle for your bike is individual and is dependent on the following characteristics:
- Riding style.
- The height and age of the owner.
- Personal characteristics of the rider.
Changing the incline angle is easy enough. It is only possible to do this on threadless types of handlebars.
In order to adjust the angle of the stem, do the following steps:
- Unscrew the bolts located on the stem.
- Find the correct angle for the stem.
- Screw the bolts back into place.
The angle you can adjust depends on the type of stem. There are three basic models:
- Horizontal. This type of stem increases the length of the bike frame.
- Vertical. This model increases the height of the handlebar.
- Angular. Such an overhang is used for the possibility of fixing additional devices and accessories.
Conclusion
To adjust the height of the handlebar or adjust the angle of inclination, it is enough to apply simple sequential actions. The step-by-step algorithm can be used not only by a professional athlete, but also by a novice cyclist.
Such actions will ensure a comfortable environment for cyclists on future trips. Travelers will not feel sore muscles, as well as adjust the bike to their riding style.
To find out how to adjust and tighten the handlebars on a Stels (“Stealth”), Stern, Forward and other brands of bicycles, determine the type of handlebar. Then follow the instructions, which were presented in detail in the article above.
Provide the highest level of comfort for yourself and your loved ones. Then each trip will bring only positive emotions and joy.


This is a great post! I never knew how important it was to properly adjust the handlebar height on my bike. It’s so informative and i appreciate all the tips you’ve given here. Thanks for sharing this valuable information!
This is a great post! It provides clear, informative instructions on how to adjust the handlebar height of your bicycle. Knowing the right way to do this is essential for having an enjoyable and safe ride. Thanks for the useful advice!