How fast does a bicycle go? This question is of interest not only to athletes, but also to ordinary people. As a rule, bike manufacturers do not equip models with speedometers. However, at the moment, cyclists can purchase such a measuring device if they wish. Fortunately, the range allows. All that remains is to figure out how to install a speedometer on a bicycle and properly set it. About this we will talk today.
Bicycle computer: a brief description
A bicycle computer is a device that provides answers to 3 popular questions:
- At what speed am I riding?
- How much distance have I traveled so far?
- How much time have I spent riding?
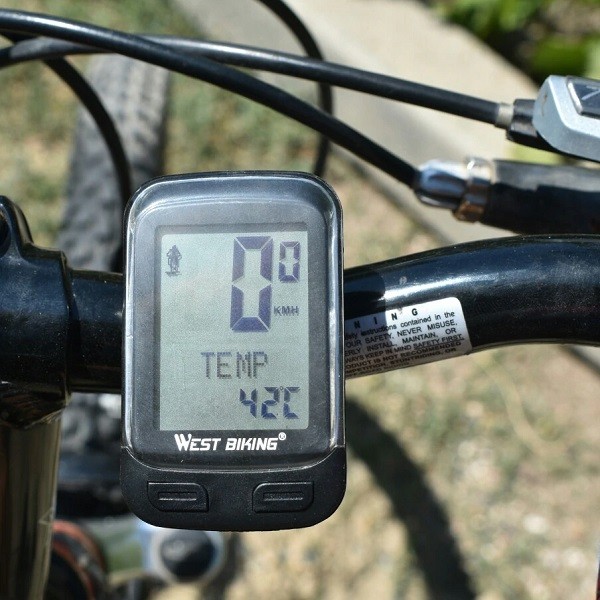
In addition, some bicycle computers display other parameters (air temperature and atmospheric pressure, calories burned, etc.), and advanced models are equipped with a GPS function that allows you to download route maps.
Velocomputers are divided into two categories:
- wired;
- wireless.
Of course, the main difference between them is the way the information is transmitted. Wireless models transmit the signal through a radio channel. Let’s understand how to properly install a bicycle computer on the bike and set the speedometer according to the model of the device.
As a rule, everything you need for installation comes with the equipment. These are ties or rubber bands, double-sided tape, and detailed instructions on how to install the bike computer. If you bought a used speedometer or bought the device in a notorious Chinese store, then a step by step guide on how to put the speedometer on a bicycle, you certainly do not hurt. That’s why we decided to tell you in detail about how to install and set up a wired bicycle speedometer. This guide is also suitable for the sb 318 bike.
Basic installation steps
In general, anyone can install the bicycle computer himself. The main thing is not to rush, and consistently follow all the steps and do not rush. The installation process of the bicycle computer can be divided into several steps.
To do everything correctly, it is necessary to describe in detail each of the above moments. In fact, install the electronic speedometer on the bike is not as difficult as it seems at first glance. Especially since a detailed manual with pictures is included with the device. If you are a happy owner of a bicycle computer, bought on Aliexpress, then the step by step instructions will come in handy.
Installing the mounting pad
Possible options for placement:
- on the outrigger;
- in the center;
- on hand grips.
The most common place for mounting is the central part of the handlebar. It is more practical to mount the computer with a large monitor on the stem, but it will be uncomfortable when carrying the bicycle. You can accidentally catch the display on the edge of the handlebar. But most cyclists prefer this place because it is easier to control the device and follow the information as you go.
For reliable attachment, use the special harnesses that come with the device. You can also install additional rubber padding to prevent the pad from slipping and falling of the bicycle computer.
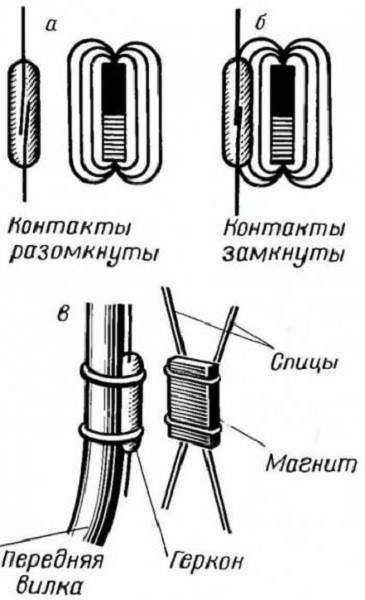
Installing the magnet
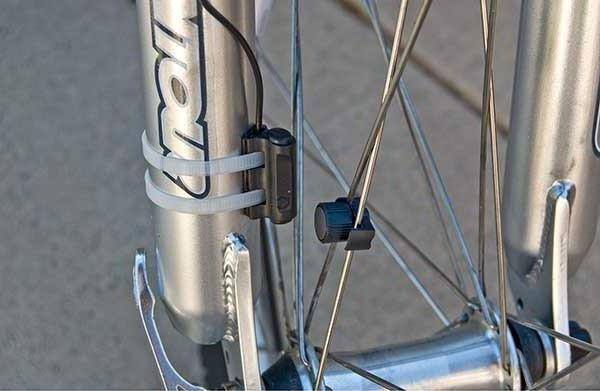
This is a very important and responsible stage, since the correctness of all actions depends on the performance of the bicycle computer and the reliability of the information it broadcasts. The system should be installed at a distance of about 100 mm from the axis of the wheel. Attach the sensor to the fork as close to the hub as possible and secure it with a clamp so that it is turned towards the magnet. The magnet is clamped to the spoke. This should be tightened as far as it will go so that it cannot move or come off while you are moving.
Laying the wire
No less responsible stage, which also depends on the correct operation of the bicycle computer. Wires must be routed and connected in such a way that they do not interfere with driving or repairs. They must lie freely enough, without bends and kinks. The algorithm for laying the wires is as follows:
- Determine the length: the distance from the plug to the main unit with the monitor (no tension) + 10% for reserve.
- Now you need to screw contacts on the pad of the block.
- All that is left is to run the wire along the steering column or along the brake cable.
When running the wire over the steering column, you should make sure to make a small overlap in the area of the bicycle frame, so that the cord does not tear when you turn the steering wheel too much. It is advisable to fasten the wire with harnesses. Laying the wire along the braking path is the most preferred option, because in this case all the overlaps are already taken into account. Wrapping the wire around the cable is undesirable, but some cyclists do this for the sake of aesthetics and reliability. In this case, the wire can be secured with regular duct tape.
Adjusting the bicycle speedometer
Concludes in entering the parameters of the wheel and setting the time. It is desirable to take out all the batteries, if they were included (this is necessary in order to reset the factory settings).
Wheel circumference
You can measure in several ways:
- With a sewing tape. We put it to the tire and fix the value (in the computer is entered the value in millimeters).
- Rope. Also put it to the tire, make a mark on the rope and measure the resulting distance with a tape measure.
- Marking on the wheel. Make a notch with a chalk or pencil and roll the wheel on a flat surface once, then measure the resulting distance.
There is another simple way: look at the marking of the wheel, and then compare the figure with the data table, which can be found in almost every manual to the speedometer. An example of such a table for clarity:
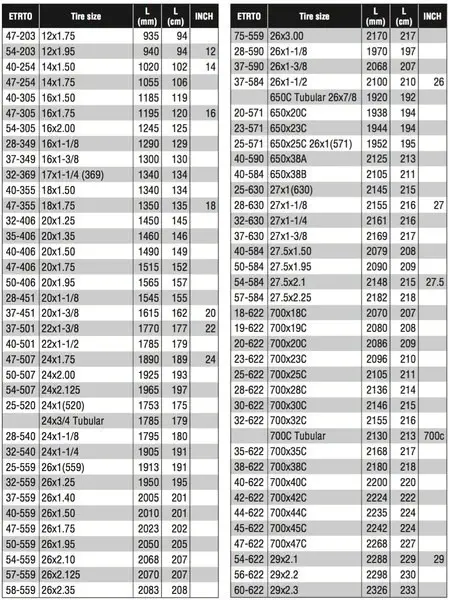
This way of measuring has its disadvantages: the fact is that different bicycle tire manufacturers define tire widths differently. For example, Schwalbe’s 2.1 is slightly wider than Continental’s. As a result, the circumference will be different, which will affect the reliability of the speedometer reading.
When entering the dimensions obtained, be prepared for the gauge to lie slightly. There is one factor that may cause a measurement error. When you measure the length of the circumference of the wheel with a sewing tape or rope, you do not take into account that when riding, the tire will sag a little under the weight of the cyclist. And that’s a few millimeters, which distorts the result.
The best way to measure wheel circumference is to draw a thin line across the tire with chalk, get on your bike and ride a few meters on dry asphalt. You’ll leave clear chalk marks on the road, and the distance between them is the most accurate circumference length.
Basic Markings
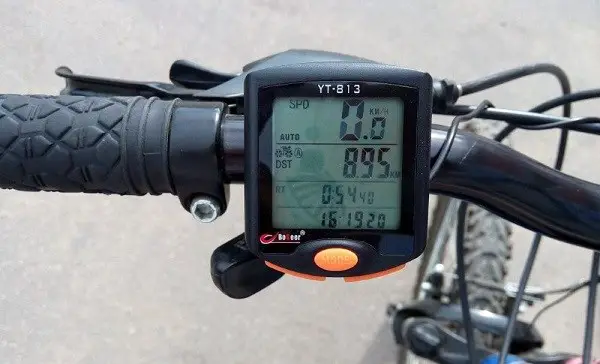
Any model of bicycle computer differs in the number of functions. However, the basic parameters can be highlighted. In order not to get confused in the designations, here is a list of the most common of them and tell you what they mean:
- SPD or SPEED – the speed of the cyclist at the moment.
- AVG or AVS is the average speed of the rider.
- TM or TIME – the total duration of your ride.
- DST – distance (total distance after resetting).
- ODO – Total distance or mileage.
The screen can also display the atmospheric pressure, air temperature, the number of kilocalories spent (you must enter the weight of the rider), as well as maps, navigation and other parameters, depending on the specific model speedometer.
Some cyclocomputers are equipped with a rather useful function: they alert you with a maintenance signal. The user himself can set the value by entering the required kilometrage to trigger the alarm.
Troubleshooting
It would seem that you have properly installed and securely fastened the bike computer, carefully wired and secured the sensors, entered the main indicators, but something goes wrong: the device does not work correctly.
The most common faults include discrepancies in the cycle computer’s readings and your own calculations. A possible cause is displacement of the magnet. To exclude this factor, you should lift the front wheel and hold the magnet close to the sensor while observing what happens on the computer screen. If the data is displayed incorrectly, you should correct the position of the magnet.
The speedometer does not turn on
It is necessary to check the batteries and only then perform a more in-depth diagnosis. The problem is that most models of cycling computers reset all settings when the batteries are depleted. In this case, you will have to re-enter all the data.
If, in your opinion, the cause is clearly not in the batteries, you should take the bike computer to a repair shop under warranty.
Speed distortion
At some point, a cyclist may notice a strange behavior on the computer: the speed on a level road may jump to 90 km / h or drop to zero at a decent acceleration. Probably, the reason is in the dead batteries. But it is not superfluous to make sure that the distance between the magnet and the sensor has not changed (this can happen after driving on snow, mud, high grass, etc.).
Conclusion
Bicycle computer – a useful device. It is not so difficult to install and configure it, if you take a responsible approach to performing each step, and it is very interesting to study its indicators. The measuring device allows you to get important information while driving, so it makes sense to buy a really high-quality and multifunctional model of a bicycle computer. By the way, some cyclists note that it is much harder to install a mechanical speedometer than modern electronic models.


Thanks for this helpful post! I had no idea how to install and set up my bicycle computer, but now i know the steps. It’s great to have a guide like this that makes it easier than ever to get started.