Despite its apparent simplicity, a bicycle frame consists of several elements, each of which keeps the integrity of the bicycle intact and keeps both wheels in position, avoiding them from wobbling or falling out. One of these elements is the bike dropout. What is this part and what does it do?
The word “dropout” is quite unfamiliar and to many cyclists even unfamiliar. It turns out that this is the name of those “ears” for the wheels, which securely hold them, preventing them from wobbling. Speaking about what is a bicycle dropout, we can say that a kind of fork feather tip – this is the so-called suspension bracket, thanks to which you can remove the wheel without loosening the chain.
Types of dropouts
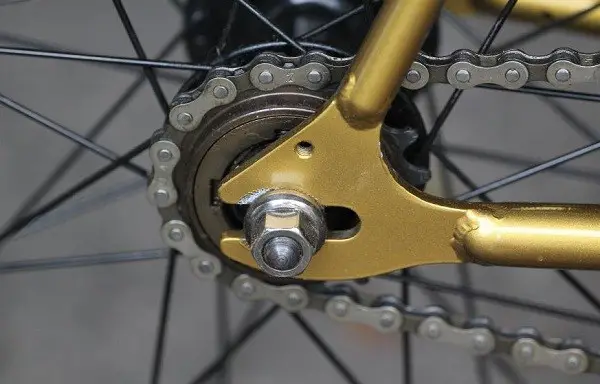
- Horizontal dropouts. Designed for the rear wheels. Extra length makes it possible to change the position of the rear wheel and perform any manipulations with the chain without removing it. Frame with horizontal dropouts is typical for single splits or models with planetary hub. They hold the wheel securely in place even when a nut or eccentric is lightly tightened.
- Vertical. Most commonly found on multi-speed bicycles. In contrast to the horizontal mounts, these mounts do not allow you to adjust the degree of chain tension. A special tensioner is responsible for this.
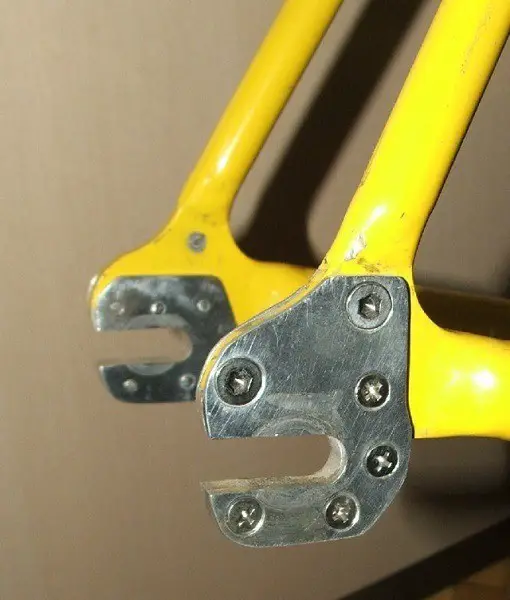
There are also removable mounts that are bolted to the ends of the frame. They are made of a light alloy which is not very strong, but at the same time can be easily replaced.
Standard dropout spacing
This parameter determines the positioning of the wheels and their riding behavior. In particular, a short axle will not fit into a proper mount, and the tightening will not be tight enough. This also applies if the axle is longer than the recommended clearance between the frame ends, in which case the wheel will wobble when driving.
Standards:
- 11 cm – for single-speed models;
- 11.4 cm – for bikes with 3-4 speed modes;
- 12cm for fixed-gear models;
- 12.6 and 13.0 cm for road bikes;
- 135cm dropouts for MTBs and some road bikes;
- 15.0 cm for extreme models.
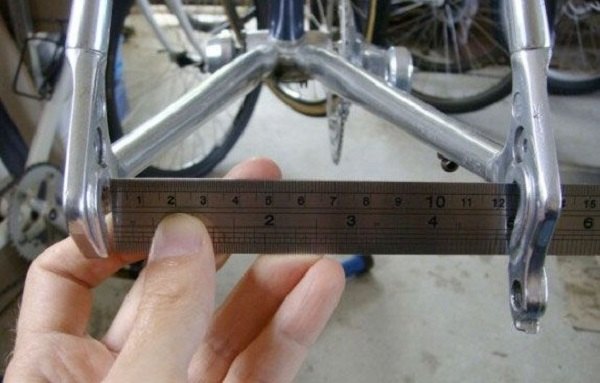
The distance between the arms is measured directly on their inner surfaces and lower ends. The measurement is made only in the horizontal plane, since all of the above distances correspond to the clearances between the locknuts, which must fit as tightly as possible to the mountings in accordance with safety requirements. Failure to do so will result in excessive tension, which negatively affects the bicycle frame and its integrity.
Standard distances for front forks are:
- 9x100mm – most bike models;
- 15x110mm – for cross country with qr clamp;
- 20×110 mm – for extreme models.
Measurement is done in the same way: the dropouts and locknuts should be lapped tightly.
Throttle bar reinforcements.
These are special parts for bikes with extra power (e.g., motor-wheel or electric bikes). Conventional suspension brackets are designed solely for wheel speed, that is, the standard load. And when it increases, the outboard bracket begins to unbend, which leads to a gap that causes the wheel to spin and the torque to be distributed unevenly.
To protect yourself as much as possible and to save the frame of the bike, install special amplifiers. They prevent the rotation of the motor-wheel in the fork, the destruction of the latter and the fall out of the wheel. Amplifiers help maintain the integrity of not only the bicycle frame and electrical equipment, but also to protect the rider from falling. Choose a booster should be guided by the drive and models of hubs.
Some cyclists try to expand the dropouts at least a little bit. Doing it yourself is not worth it – after all, for such work you need the appropriate experience and practice. But still there is an option (although it is a homemade method):
- Buy a stud of 10 mm in a store of building materials. If the native axle is thinner, you need to buy a stud and 4 nuts of smaller diameter.
- Insert the stud instead of the bushing and gently unclamp a couple of millimeters more than the original size.
- Release and check the result.
- The next run: + a few millimeters more to the previous result. And so until the goal is achieved.
At the end, you must be sure to check the parallelism of the suspension brackets to the plane of the frame and the flatness of the “cock” and bend a little (this can be done with the same stud with nuts).
Conclusion
Based on all of the above, we can conclude: dropouts – important elements of the bicycle frame, which directly maintain the integrity of the entire design of the bicycle frame. With regular and dynamic riding, it is important to pay attention to the fasteners from time to time.


