The pedals are one of the most important elements of bicycle control. They are the ones that transmit the force from your foot to the undercarriage, which is what makes the vehicle move. Today we’re going to talk about how to remove a pedal from a bicycle and then put it back on. For those who think it’s no big deal, we’re going to disappoint – it’s not that simple, gentlemen. If you twist it the wrong way, you can break the connecting rods, which is fraught with more serious repairs and financial losses.
When you may need to unscrew the pedals on your bike
The part under discussion does not receive as much attention as a bicycle chain or wheels, for example. But sooner or later a cyclist will encounter a situation where he has to unscrew the pedals on his bicycle. What are these situations? Let’s look at the most common ones:
- Maintenance of your bike (at the end or beginning of the season). Pedals should be cleaned of dirt from time to time, lubricated and checked for damage.
- When specific sounds (crunching, squeaking, rustling, etc.) occur.
- When it is necessary to replace broken or old pedals with new products.
- To reduce the size of the bicycle, when it is necessary to pack it in a case or to carry it in public transport.
- Anti-theft measures – you can’t go far on a bicycle without pedals. They unscrew quickly enough and just as easily put back on. All you need – primitive tools and a small bag where you can put the products.
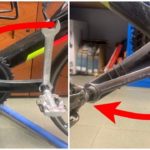
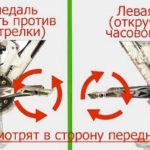
To easily remember which way to unscrew your bicycle pedals, remember how you rotate them while riding. The products are unscrewed against and screwed in the direction of travel.
The necessary tools and materials
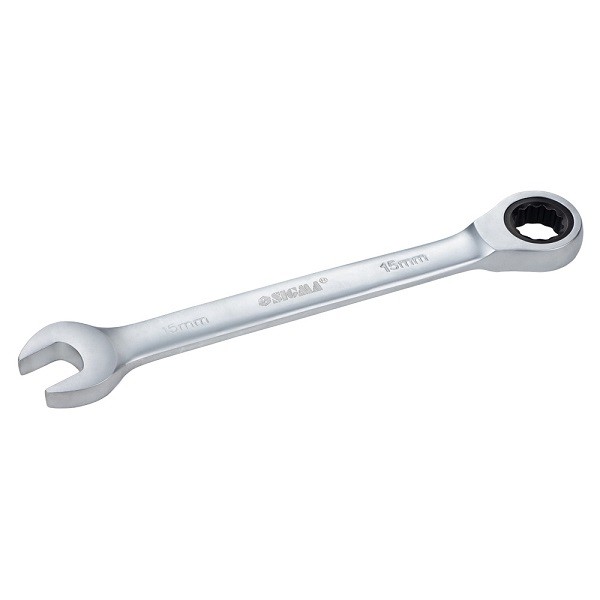
To dismantle the pedals, you will need the usual garage tools that everyone can find. The only snag here is what kind of wrench is needed to remove the pedals. Don’t worry – you won’t need a highly specialized tool. All you need is:
- open-end wrench (15 mm);
- adjustable wrench – a universal tool for repair work (preference should be given to small products – with their help it is easier to get to the nut);
- hexagon socket;
- bicycle kit (just in case);
- puller – an additional device for contact types (holds the axle while turning the wrench when turning it).
Since you decided to change the pedals on the bike, it is not unreasonable to perform “hygienic” procedures. To do this you will need:
- clean and dry rags;
- grease;
- WD-40, kerosene or solvent in case there are heavily soiled areas.
Now that you have prepared everything you need, you can get to work.
Step-by-step instructions for removing a pedal from a bicycle
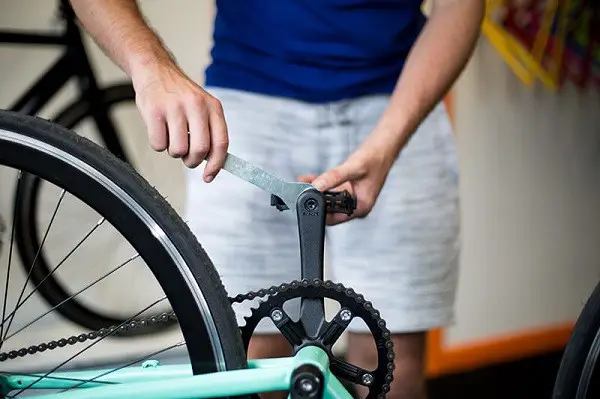
First, you need to put the bike in a comfortable and stable position. The best option is on the wheels. Using a special stand that holds it by weight in this case is not the best solution, because you often have to exert considerable effort when unscrewing the pedals.
If we are dealing with standard models, the process of pedal removal is as follows (we start with the right product):
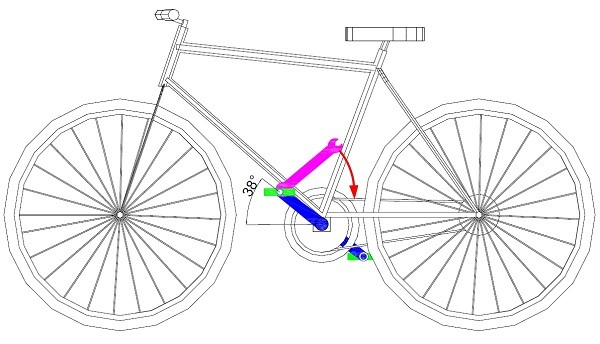
- Scroll the pedals in the direction of the handlebars, bringing them into working position: the right crank is set at 45 degrees (the so-called 3 o’clock, and for the left – the mode “9 o’clock”), so that it is parallel to the ground.
- Using a small adjustable wrench, unscrew the pedal from the connecting rod.
- From the end part of the platform remove the plug, under which “hides” the lock nut.
- The second wrench clamp the axle at the crank and remove the lock nut.
- There is also a washer that should be unscrewed.
- We remove the cone and disassemble the platform, holding the bearings.
To avoid losing bearings, put a sheet of paper or cardboard, some container like a tray or an unnecessary rag under the pedal. The left pedal is removed in the same way, but taking into account the back side of the thread. Note that the number of balls in both pedals should be the same. During the assembly/disassembly it is desirable not to mix them with each other: the right balls should go back to the right pedal and the left balls, respectively, to the left pedal.
The old grease can be removed with WD-40 or common solvent. But it happens that to remove the pedals from the bike (an old Stealth, for example) does not work – the product does not lend itself to dismantling, and that’s it.
What to do if the thread on the axle does not come off
If there are problems during disassembly and the pedal is permanently “stuck” to the axle, you have to resort to special measures:
- First try to put WD-40 on the joint and leave it for 10-15 minutes.
- If you do not have WD-40 at hand, use a similar compound (kerosene or any solvent). But in this case a few minutes will not be enough – you will have to wait 2-3 hours.
- If even that did not help unscrew the pedals, try a longer wrench or put a metal tube on it.
Some craftsmen use another method that helps remove pedals on speed bikes and other models. Pour a kettle of hot water over the joint between the axle and the crank. The idea is that the high temperature should cause the metal to heat up a bit, which will decrease the tightness of the fit. It makes sense, but a construction hair dryer or a high-powered soldering iron is better for this purpose. When working with this tool, heat the joint between the axle and the crank, and watch the temperature of the pedal body (especially if it is a plastic product).
If this didn’t help either, try hitting the problem area with a hammer a few times to move the threads at least slightly from the dead point. Never hit the pedal or crank itself, you will only ruin the parts.
How to put a pedal on your bike
Some cyclists have questions about the compatibility of threads on pedals and crankpins. The fact is that the threads on modern products do not match the threads cut in the Soviet cranks. If you have no problems with this point, move on to install the pedal on the bike, but first clean old grease and dirt from the threads.
Step-by-step instructions for installing the pedal:
- Make sure there is grease. If there is none, apply a small amount to the threads. So you protect the product from corrosion, “sticking” to the crank and greatly facilitate your life in the future – then it will be much easier to remove. Common solideol or any other water-resistant compound will do.
- Start screwing in the pedal without improvised tools – only by hand, perpendicular to the axis of the crank. In this case, the chances of damaging the threads with axle misalignment are minimized.
- Now go back to the removal instructions and follow them, but in reverse order.
- If there is a hexagonal slot in the end of the pedal, you can screw it in with the same slot. But it will not be possible to provide sufficient load and to screw in pedal well – it is better to use hexagon first and then to press it with wrench.
- You should screw the axle into the crank with force, but without fanaticism. Of course, you will not break the thread, but it will be very problematic to unscrew the thread afterwards when it is tight. The recommended tightening torque is 35-40 Nm. If you do not have a torque wrench, just tighten with enough force, but do not overdo it.
Finally, remove any remaining grease that will protrude where the elements join. Over time, dirt may accumulate there, which will only accelerate the wear of the parts.
What is the difference between inexpensive pedals and expensive products when tightening
Naturally, in the quality of workmanship and design features. Namely:
- Budget Pedals. When screwed in, the axle damages some of the metal on the crank, which can cause a clicking noise during rotation. Such axles are found on the cheapest products. The problem can be solved by putting a washer under the pedal.
- Expensive spare parts. In this case, the axle does not spoil the crank, and the pedal is much stronger pressed.
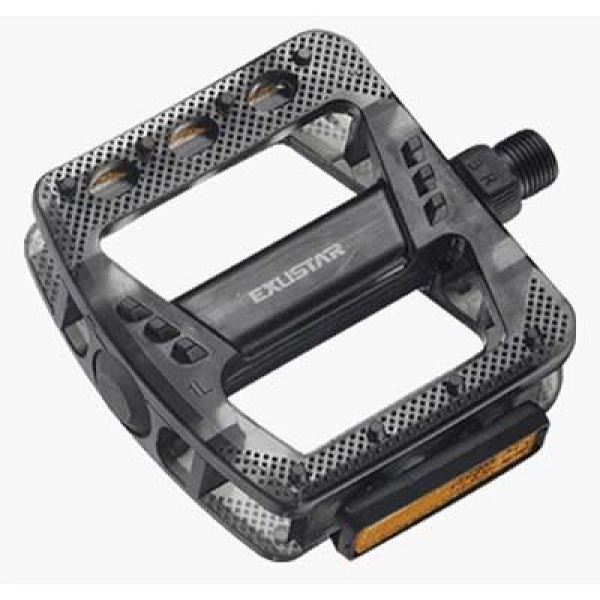
Today you can find a variety of pedal modifications on sale – these are the usual walking, “stomping” for mountain bikes, contact and semi-contact models, folding, road and tuklips.
Recommendations for checking pedals before riding
We already said at the beginning that a bicycle without pedals is of no interest to intruders, because it is impossible to ride it. To avoid being in that friend’s shoes, keep an eye on the condition of all the parts and components of your bicycle – don’t neglect the pedals. Periodically check the following points:
- the degree of clamping. Sometimes you can also tighten the pedals a little;
- The absence of backlash. If a gap has formed in the joint of the part, it must be eliminated;
- The condition of the pedal body. It must be intact.
Try to stand on the pedal, and then spin it. You can tell by hearing the quality of the cranking on the axle, and visually – the absence of runout.
Be aware that an insufficiently twisted or broken pedal can cause injury. Not only the cyclist himself, but also people around him can be injured.
Conclusion
A bicycle is structurally a simple mechanism consisting of various parts and assemblies. But it is the coordinated work of each of them ensures a comfortable ride and enjoyment. Take care of the health of your horse, do not allow critical situations when you need a complete replacement of the pedals on the bike.


