Even with the most careful and vigilant cyclist can happen this unfortunate trouble – no one is immune from a punctured wheel. To fix the defect, you need to know how to tape the camera of the bicycle at home. Moreover, there is nothing complicated about it. The main thing – to adhere to a certain sequence of actions and responsibly approach the implementation of each step.
Standard actions when repairing

Repairing the camera is a familiar thing for cyclists. Getting accustomed to this process, you can glue the camera for literally 15 minutes. Beginners without proper skills will need a little more time. In any case, the algorithm of actions is identical.
Tools

Of the optional attributes you will need:
- A container with water – will help to determine the exact location of the puncture;
- vise – you may press the camera and the edge of the patch to each other;
- a puncher – a special tool with which the process of detaching the tire from the rim will go much easier and faster;
- a set of hexes and wrenches.
Of course, you can do without the above items. But with them the repair process of the bicycle tire will go much faster.
As for the mandatory tools and materials, you will need:
- Repair kit. This is a standard “first aid kit” for a bicycle, which includes several patches of different sizes, glue and a piece of fine-grained emery.
- A bicycle pump.
- Montazhka. The practicality of this tool is hard to overestimate.

It is worth paying attention to the choice of glue, because it is the quality of the composition that determines how firmly the patch will stick to the camera. On sale there are budget sets for mass use and more expensive kits, designed for rapid repair in the field. Experienced cyclists speak positively about the following brands of glue:
- RedSun. One of the best budget formulations, which dries in 5-15 minutes. The adhesion rate is quite high, so the repaired camera should continue to serve faithfully for a long time.
- “Moment” for rubber. A cheap analogue of the previous option. It takes a little more time for complete drying, but at the same time it is easy to rinse off the hands and easy to apply.
- Tip-Top SC 2000. One of the most expensive brands. The glue dries for a long time – from 2 to 4 hours. The cost of one tube can reach 2000 rubles. But in its composition there are components designed exclusively for gluing rubber parts. The patch is attached in a way similar to the vulcanization method.
Of course, you can also glue a hole in the camera with the usual “Moment”, if the situation does not involve a full repair. But at the first opportunity, you should disassemble the wheel and do everything properly. So, when all the tools are assembled, you can proceed to repair the wheel.
Step by step instructions
You need to follow a certain sequence. If you have never had a tube repaired, just follow the further instructions.
Dismantle the wheel
To glue a puncture with your own hands, you need to remove the wheel together with the rim and tire. Sequence of steps:
- Disconnect the rim brakes and remove the fenders if they are in the way. Turn the bike over by putting it on the handlebars.
- Unscrew the bolts holding the hub or eccentric.
- Carefully remove the wheel. If it is a rear wheel, hold the chain, pull the axle away from the saddle, lift the wheel slightly and pull it out.
This is not the most difficult part of the repair process. Much more difficult is the removal of the tube, but over time you will not have a problem with this process as well.
Removing the inner tube from the wheel

To begin with, you need to disassemble the wheel with the help of an assembler or any other handy tool with a flat (not sharp) surface (for example, a screwdriver). Algorithm of action:
- Completely deflate the inner tube by unscrewing the valve from the nipple.
- On the back of the wheel, look for a suitable place for disassembly. This should be some distance from the nipple.
- Insert a screwdriver or a blades vertically down between the rim and tire, taking care not to hit the rubber.
- Step back 15 cm from the first opening and insert the second element in the same way. Then gently lift the tire until a small part of it is outside the rim.
If you have done everything correctly, all that remains is to pull the remaining rubber out by hand, and then pull the valve out of the groove in the rim and remove the tube completely.
Finding the Damage
Let’s move on to the most important and responsible stage – finding the damaged place. To find the puncture, many people recommend pumping up the camera and submerging it in water. This is really one of the most effective and efficient ways, but not the only one.
In addition, this method of detection has a very significant disadvantage – it is not suitable in conditions of limited time. After all, after immersion in water, the wheel must be completely dry before it can be glued. In addition, if water gets into the nipple, more serious repairs may be necessary.
You may also be able to identify the damaged area by ear. Pump the camera and listen for it. Generally, large holes can be seen visually and small punctures are easy to identify by ear. If the defect is located on the free part of the camera, it is enough to simply tape up the hole. If it is near the valve – you will have to make more serious repairs or replace the camera at all.
It’s a fact! In the vast majority of cases, the hole is either in the area of contact with the asphalt, or somewhere on the side of the rim.
Taping

Found damages, if there are several, it is better to mark with a crayon or marker for convenience. Now proceed directly to the repair. Sequence of actions:
- Clean the damaged place. The task is to degrease the surface. In the garage we use acetone or gasoline for this purpose. In the field we are limited to a clean and dry rag.
- Next, you need to sand the same place with sandpaper or a fine-grained grater. It is not necessary, but on a rough surface the patch will hold better.
- Take a patch of the right size, remove the protective film from it and carefully apply a thin layer of glue. Here, follow the instructions on the tube. In some cases, the composition must be applied to both adhesive surfaces.
It remains only to carefully attach the patch to the puncture point and press down firmly, without allowing the elements to shift. Now we wait for the allotted time. If possible, the camera can be clamped in a vise. If you do not have at hand a patch, you can use a piece of old rubber from a used bicycle camera.
Reassembling the Wheel
Ideally, the glued tube should rest quietly for 24 hours. Even if the instructions for the glue say that 5 minutes is enough. Before reassembling the wheel, inflate the tube a little – it’s easier to work with this way.
First, put the nipple in the hole in the rim. Then gently slide the tube into the tire. If you removed the whole tire, pay attention to the direction of rotation (indicated by the arrow labeled Rotation) – this is necessary for proper tread work.
Now gently press the tire into the rim. Do this first with your fingers and then use a screwdriver or presser bar. In the final step be careful not to damage the product you have just repaired with the tool.
The next step is to ensure that the tire is properly seated in the rim. It should be placed directly into the seating beads. While inflating the wheel, consider the location of the beads on the rim: they should not go inward and the sidewall should not be crumpled. There are two ways to achieve a good result:
- Gently inflate the air to the maximum pressure – in the process the tire aligns itself.
- Pump up the tube to 0,8-1 atm. and then use your fingers to straighten the crumpled areas.
After that you only have to put the wheel in its place and estimate the result of the performed work.
Alternative way of repair
Unfortunately, many cyclists do not always keep a repair kit. In case of an emergency, you will be helped by ways that allow you to glue the bicycle camera without special paraphernalia. Let’s tell in detail about each of them.
Without using glue
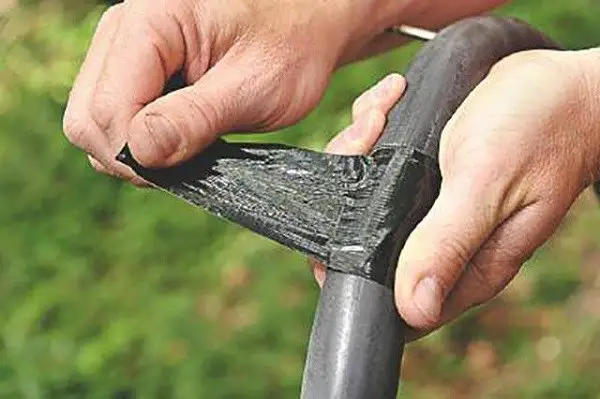
The most primitive option – the use of duct tape. The main task is to create an optimal level of pressure in the camera, which will reliably press the patch and will not allow air to escape. The patch can be made from the same duct tape or a piece of plastic bag.
Another way to repair a bicycle inner tube without glue:
- Turn the bike over and place it on the handlebars. Identify the location of the damage.
- At the punctured area, bend the tire away from the rim, remove the tube and tie it in a knot.
- Tuck the edges of the tire back under the rim and inflate the tube to the maximum possible limits.
An extreme method that is suitable for situations where there is nothing suitable at hand:
- take out the punctured tube;
- and stuff the tire tightly with cones and grass.
Of course, this is a barbaric method, but it is better to slowly ride on a wheel of cones than to drag the bike on your shoulders for several kilometers. Methods of repair in the field are not reliable, so it makes sense to carry at least a few self-adhesive patches. Some products are quite good and allow you to get to your destination without too much trouble.
Vulcanizing
Some folk craftsmen effectively repair punctured wheels with raw rubber or the vulcanization method. But this method has significant drawbacks. Firstly, it is not always possible to have a special apparatus at hand. And even if you use an ordinary iron, there is no place in the woods to plug it in. Secondly, this method is fraught with much more damage to the rubber.
Innovative means
It is possible to cope with punctures and without a repair kit. All you need to do is to pour a small amount of anti-spill fluid into the camera and drive 2-3 km to evenly distribute the composition on the inner surface of the camera. It is rather a preventive measure, i.e. the manufacturers recommend to pour the liquid before using the camera in order to increase its durability.
Recommendations to prevent punctures

Any trouble is easier to prevent than to deal with the consequences later. In any case, a glued camera will serve you much less than a new wheel. Therefore, try to follow these recommendations in order to perform repairs of the bicycle camera as seldom as possible:
- Keep an eye on the pressure level in your wheels. Excessive or excessive amount of air in the camera is fraught with punctures.
- Watch the road. If possible, try to avoid potentially dangerous areas.
- Give preference to denser rubber products. If possible, use anti-tear fluids and tapes.
- Pay attention to the condition of tires. Any abrasion is a threat for integrity of the tube.
And lastly, take care of your bike’s wheels. If your bike is not designed for jumping, do not storm the curbs and stairs. Otherwise, just repairing the tire is not the end.
Conclusion .
There are quite a few ways to fix a punctured tire in spartan conditions. However, experienced cyclists always keep with them the necessary set of tools and materials to cope with the breakdown in the shortest possible time. Therefore, if you have a long road, take with you bicycle “first aid kit” – it does not take much space, and its usefulness will be invaluable in case of force majeure.


Great post! This is a really helpful and informative guide on how to properly tape a bicycle camera. Thanks for sharing your tips!