A bicycle generator is a device that allows you to obtain electrical energy by pedaling and use it to operate your bike’s lights or other accessories. Depending on the design characteristics, bicycle generators are divided into 4 types. The most primitive design is a dynamo hub. A more serious unit is a non-contact bicycle generator. About each variety we will tell a little later.
Knowledge in mechanics is not necessary to understand: the current output and, consequently, the voltage, are directly related to the speed of rotation of the pedals. This rule applies to all types of bicycle generators. The device outputs an alternating current that comes in waves, which can be stabilized by installing a bridge rectifier. As the latter, diode lamps soldered together or special components (e.g., a 2-period rectifier) can be used.
What is an alternator for bicycles
Being able to connect to at least a small source of electricity is a great fortune for the cyclist. Especially for those who prefer to ride for long distances. Running lights, charging your phone or navigator – none of this can happen without electricity. You can, of course, pack batteries and energy storage units, but this is not always practical and convenient. The solution can be a bicycle generator – a compact device that produces alternating current while pedaling.
Why you need it
Imagine: you can ride your bike at night, and the bike headlight is powerful enough to illuminate the road. It doesn’t use up battery power or autonomous storage power – the light’s output just depends on how you pedal. Convenient, isn’t it?
A bicycle generator is a practical solution for those who often make outings in the dark. For the operation of lighting devices on the bike, a generator is simply an indispensable device. Moreover, it allows you to recharge your phone, navigator, speaker and other gadgets directly while riding.
Varieties of bike generators
As we have already said, bicycle generators are divided into 4 categories:
- Bushing generators. In fact, this is a magnet-modified ordinary bicycle hub. The mechanism of its action is reduced to the formation of eddy currents. At the output you get energy, which is suitable for the functioning of various bicycle devices and accessories. The good thing about the hub dynamo is that the resulting current is transmitted directly to the bike’s headlamp. It is a small device that is attached directly to the hub and not to the wheel, which eliminates the possibility of generating additional friction. As for the disadvantages, a bike generator of this type has little effect on the speed of the bike, and also makes it a little heavier. As the pedals rotate, the current comes in waves, accelerating and decelerating – accordingly, a stabilizer is needed on the hub generator. The device consists of several components: an armature that wraps around the axle; a ring magnet that attaches to the hub; and double wires with terminals.
- Bottle. The devices got this name because of some property with a bottle. The device is mounted on a wheel. Bottle generators have a small cost and almost no change in the weight of the bike. At the same time, such devices do not work well in wet weather, and their work is accompanied by a specific sound. Bottle generators are suitable for short trips in clear weather.
- Non-Contact. Devices of this plan are the most expensive. The high price is due to the almost absolute absence of flaws. The principle of operation of non-contact Bicycle-generator—what-it-is-and-how-to-make-it-with-your-own-hands-at-homes is reduced to the accumulation of energy from the rotation of the wheels through a magnetic field. The device is located in close proximity to the wheel, in which the hub dynamo is built in – this allows to almost completely level out the force of friction and resistance. These devices are characterized by low weight and the ability to save energy to operate the headlights during stopping. As for the disadvantages, the high price is probably the only possible disadvantage.
Considering the characteristics of each device for generating energy, you can choose the most appropriate option depending on the specifics of riding and personal preferences. A generator for a bicycle can be purchased in a store, and if you have the necessary components and tools, you can try to make it with your own hands.
How to make a generator from a bicycle at home
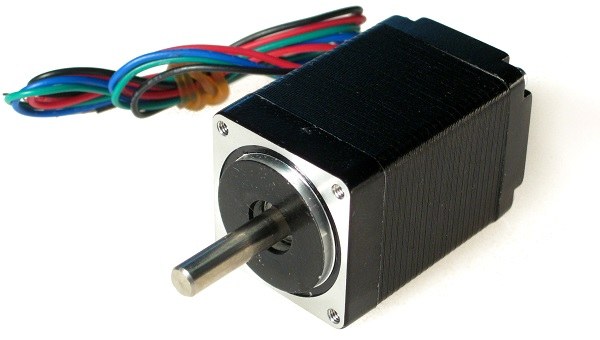
stepping motor
As the basis, a stepper motor should be taken. In order for the device to provide sufficient power to the lighting devices of the bicycle, it must have the following characteristics:
- rated current – 2.4 A;
- resistance – 1.2 Ohm;
- the output voltage – 2.88 V.
Mount the device directly near the rear wheel. In order to ensure the transfer of rotation from the wheel to the flywheel (rubberized wheel), you need a transfer ring. It is better to prepare in advance the necessary materials and tools to work in peace of mind to create a useful bicycle device.
Materials and tools
To build a generator for a bicycle, you will need:
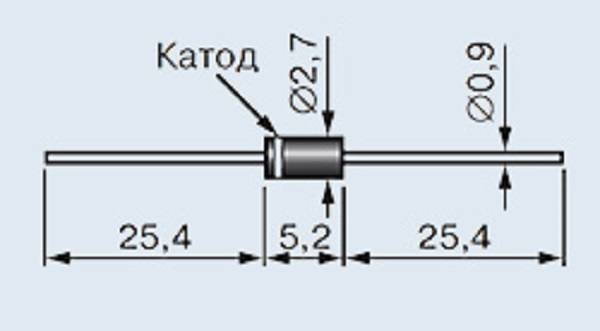
- flexible plastic tape (will go to create the flywheel);
- Rectifier type 4 LEDs (such as 1N400) – 4 pairs;
- a line voltage regulator (AC stabilizer);
- one watt resistor (Cf-100);
- 1206 resistor for 802 ohms;
- 0.25 watt diode resistor;
- single watt diode;
- wiring;
- 1 uF capacitor;
- Capacity for the generator (an ordinary plastic box will do).
A plate can also be useful to create some extra space for mounting (not obligatory).
As for tools, a primitive kit consists of the following items:
- a glue gun with glue sealant;
- pliers;
- welding machine with the necessary consumables;
- A sharp clerical knife.
Now that everything you need is assembled, you can get to work.
Instructions
In order not to redo the same work several times, you should use an already prepared algorithm of actions, which will allow you to avoid common mistakes.
You should start by making a transmission ring. The generated current should flow from the wheel to the flywheel of the motor through a special joint, which is the transmission ring. To make it, you need to twist a plastic band into a ring and solder the ends, and cut small holes on the sides to fit under the spokes. It is desirable that the depth does not exceed ¼ of the thickness of the twisted tape. The transfer ring should be placed on the spokes, and then secured with sealant adhesive.
The further algorithm of actions comes down to the fabrication of the generator itself. The sequence:
- Diodes type 1N4004 solder each other to a parallel arrangement.
- Capacitor to fix in the middle of the “+” and “-” ends of the circuit.
- Attach the resistor together with the stabilizer to the resulting construction.
- Attach a single watt LED with a resistor to the headlight circuit.
- Connect the headlamp to the capacitors with the wires.
- Connect the alternator to the electrical circuit.
For more convenience, you can additionally install a switch between the capacitors. Its principle of operation is to close and open the electrical circuit, which allows the cyclist to turn off the headlamp while cycling.
All that remains is to securely fasten the electrical circuit to the bike and secure the wires with clamps so that they do not interfere with the movement. And the last step is to check the operation. The flywheel as a result should move synchronously with the rear wheel. If everything is done correctly, the headlight will turn on when the pedals rotate. Flickering of the illuminator at low speed is normal.
Conclusion
A bicycle generator can also be made by yourself, if you have the necessary components and tools on hand. Making a dynamo hub is much easier than making a non-contact generator – it will require more parts and much more time. Having an alternator on your bike allows you to ride unhindered in the dark.


