When a bicycle ceases to be just a hobby and becomes a full-fledged hobby and an integral part of life, there is a quite logical question: why not build a full-fledged unit yourself? After all, in this case, you can get a custom bike, which from the bolt to the transmission will fully meet the requirements of the owner. It remains only to understand how to assemble a bike from scratch.
Today we will tell you what is better: to assemble a bike from scratch or still go in search of a ready-made model. And we’ll also look at the main things you need to know beforehand.
Pros and cons of the assembled bike
For one thing, a ready-made bike is a ready-made bike. The manufacturer has already taken care of the appearance and the technical component of the bike – all you have to do is buy it and enjoy the smooth operation of all the mechanisms.
On the other hand, you can walk around bike shops, look into the shops, connect to social networks to find the right components and build your own custom, which will get a little cheaper than the store’s analog, but closer to the heart, because it is collected by hand and with love.
The advantages of the assembled bike:
- Almost every detail is fitted to each other, taking into account the wishes of the owner and the advice of experienced cyclists.
- The final amount of self-assembly can “catch up” with the cost of a ready-made bike, but the quality of assembly, as a rule, is higher, so the self-assembled bike is often a much more profitable investment
- Assembling a bike from scratch is a fascinating process that allows you to get used to the bike, feel every joint and get even more pleasure out of riding it.
As for the minuses, there is only one point to note – it is the time spent on finding the right parts and mechanisms, assembling and adjusting all the components. But time spent with pleasure can hardly be called a negative factor.
Tips for those who decide to assemble a bike from scratch
A few tips from those who have assembled their bike on their own will definitely not be superfluous – they will help to avoid common mistakes and outline a clear plan of action:
- “Settle” on bicycle sales and forums, which are inhabited by avid cyclists, constantly monitor the arrivals at the nearest bike stores – this will save on the purchase of spare parts.
- When buying a particular used part, pay attention to the seller. If it is a girl or a skinny nerd guy – you can take it. If it is a brutal racer, weighing over 100 kg – better give up the deal.
The most suitable candidate for the donation of bicycle parts – a major fetishist who wipes his bike with ear sticks. As a rule, such people are constantly in need of an upgrade, and they rush to get rid of the “old stuff” for half the price.
- Some parts you can safely buy even after intensive use. For example, the front derailleur hardly ever wears out. Shifters, by the way, too – they often outlast other “neighbors” in the transmission.
And with forks and shock absorbers you should be more attentive – the expert opinion comes in handy. You should also pay attention to wheels – rims must be intact, without cracks and dents. If the self-assembly project includes non-standard spokes, think in advance where you will look for the necessary elements.
- It is impossible to economize on a frame. Custom must be assembled based on your desire and common sense, but not on your capabilities. Therefore, you should buy this detail in a store, and not from hands.
- If you dared to assemble a bike on your own, choose components that will be in harmony with each other. This applies to color, shape, size, design, etc. The same can be said for brands – do not mix Shimano and SRAM. It is also undesirable to put parts from mountain models on a road bike.
- Try to take occasional distractions from your project. When the desire to build your bike takes up most of the time, there can be “side effects”: apathy and an unwillingness to continue the work that has begun.
And one more piece of advice, which is more psychological than technical – be prepared for criticism. There will always be someone who will censure your work, saying that there is a better and cheaper bike in the store. Don’t pay attention – let the man vent his energy, because he, unlike you, is not capable of more.
A harmonious combination of new and used parts
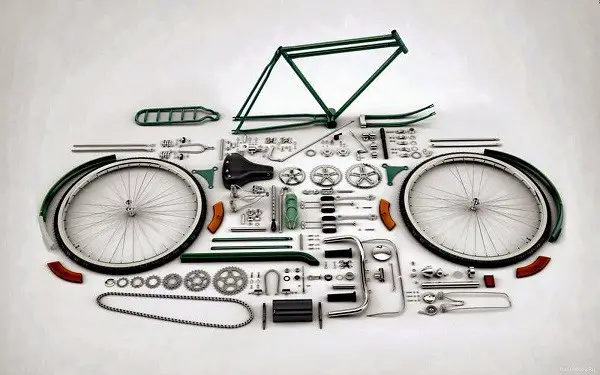
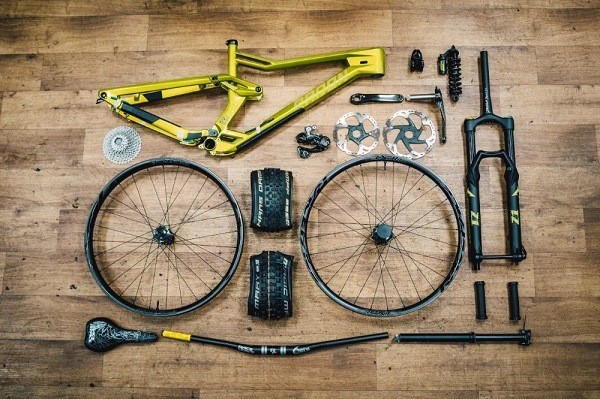
Before you become a regular at bike junkyards, you need to understand what to look for and in what condition should be the parts. As we have already said, the parts do not always have to be new – in some places you can save money by buying a second-hand mechanism. So, let’s list the main components that you will need for the assembly:
- frame;
- fork;
- wheels(rims, spokes, inner tubes, tires, sprocket cassette);
- handlebar and stem;
- saddle and seatpost;
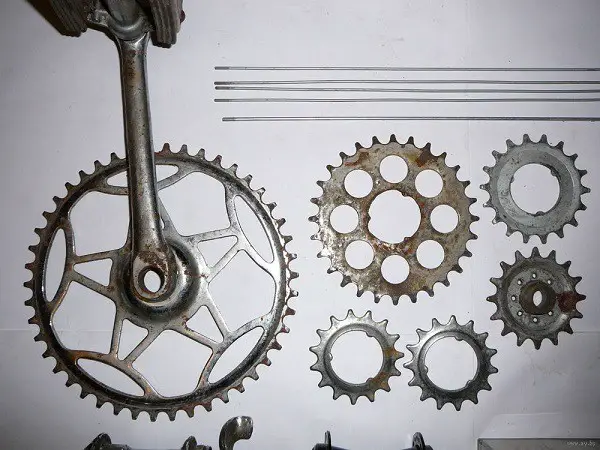
- connecting rods with carriage and front sprockets;
- drivetrain(shifters, cables, cassette, chain)
- brakes.
These are the main mechanisms and units of any bike. Here it is important to see clearly the end result – will it be an urban bike or road bike, mountain bike or hybrid. Now let’s figure out what from this list should be new, and what you can buy and in used condition – let’s look at the example of a road bike.
So, let’s start with the frame. It is possible to buy it with a hand, but on the condition that it will be 100% quality, without a single dent, crack and other defects. If this point is doubtful, it is more reasonable to buy a new part from a proven manufacturer.
Next in search – the wheels. You can, of course, spend time and try to find a decent option among the many offers of used parts. But it is better to buy new rims and tires. The thing is that used wheels can have defects that can’t be seen immediately, such as symptoms of metal fatigue. Tires can be borrowed, but you should pay attention to the tread pattern and the quality of the rubber.
Supported saddle with seatpost, fork, handlebar and other dodgers will fit harmoniously into the design of the self-assembly. Particular attention should be paid to the shock-absorbing forks – often among the used parts there are low quality products. The seatpost is an ordinary metal tube that connects the saddle to the bicycle frame. Pay attention to the length of the seatpost and the integrity of the tube. As for the additional hangers, they must fit the model to be assembled.
At the flea markets of cyclists can find good shifters, shifters of good quality, cables and other elements that will be useful for assembling the bike. It is extremely undesirable to buy components, the quality of which is questionable – in this case, you should opt for new parts.
As for the other elements, then buy on bicycle dismantlers brakes, elements of the transmission and other spare parts are not recommended. The technically important components are subject to higher requirements, because they are responsible for the safety of the ride and durability of the assembled unit.
And now it is worth saying a few words about the possible consequences of buying technically important parts off-hand:
- A used carriage is more likely to affect your bike’s speed and torque transfer.
- Used connecting rods don’t hold up well, and broken ones won’t hold their place at all.
- Needless to say, what dangers are posed by worn and malfunctioning brakes?
- A worn chain and sprockets mean constant gear-shifting problems, regular slippage and no fun to ride.
And now let’s summarize: let’s designate which spare parts can be bought from hand, provided they are of good quality, and which should be purchased only new in stores:
| The part | Can I buy used? |
|---|---|
| Frame | +/- |
| Wheels | – |
| Tires | +/- |
| Fork | +/- |
| Rudder | + |
| Saddle and stem | + |
| Carriage | – |
| Crankbars | – |
| Hand grips | +/- |
| Cables | +/- |
| Switches | +/- |
| Sprockets | – |
| Circuits | – |
| Brakes | – |
| Additional skirts | + |
Instructions for assembling a bike from scratch
You’ll need special tools for the big job:
- carriage puller;
- whip and puller (for the cassette);
- wire cutters;
- plus and minus screwdrivers;
- pedal wrenches;
- lubricant;
- wrench;
- clean, dry rags.
So, you have assembled the “skeleton” of the bike – it is still represented by separate elements, but very soon all the parts will fall into place and the future custom will begin to acquire recognizable features.
Assembling a bicycle consists of several stages:
- Installation of the carriage assembly, front stars and connecting rods.
- Installation of the cassette on the rear wheel.
- Mounting the handlebar and fork into the front frame cup.
- Mounting the handlebar to the fork body, seatpost and saddle.
- Installation of tubes and tires on wheels.
- Mounting the rear wheel, chain and derailleurs.
- Mounting the rear wheel to the fork.
- Installing the brakes.
Now let’s analyze each step in detail. The axle and the carriage bearings are installed in the lower rack of the frame, and then the connecting rods are mounted with a special tool. A small amount of force is required to mount the carriage assembly. This point also applies to mounting the rear cassette to the rear wheel hub.
You can install the fork yourself if you have the appropriate experience, but it is better to seek help from a bike workshop. Because this process involves the accuracy of pressing the casing into the cup. The bearings are installed so that the fork can turn freely around the axis when you turn the handlebar. Here, too, it is advisable to contact a professional mechanic, but if you want, you can try it yourself. To do this, you need:
- Insert the steering column into the cup, pressing in the upper and lower elements in series.
- Carefully insert the fork stem into the steering column.
- Tighten the lock nut as far as it will go.
Pay attention to the position of the column in the cup – it must be strictly vertical. Otherwise, the wear and tear of the tube and fork will not be long in coming.
The next stage of assembling the bike from scratch is the installation of the handlebar and seatpost. Here it is necessary to determine in advance the height at which the saddle will be located relative to the handlebars. If a normal bike is assembled, the handlebars and the saddle are approximately at the same level. If it is a mountain model – the saddle is slightly higher than the handlebars. If it is a road bike, the saddle should be even higher than the mountain model. In addition, a longer handlebar stem should be installed as part of the road bike assembly process.
Now you can move on to assembling the tires and tires. To do this, a flipper is placed on the inside of the rim, which protects the tube from the sharp tips of the spokes. If you don’t have a flipper handy, ordinary duct tape will do. After that, you need to put the nipple of the tube in the appropriate hole in the rim and distribute the tube evenly over the surface of the wheel. After that, put on the tire with one side. Next, use a spatula or any other non-sharp object to pick up the second edge and pull the tire behind the wall of the rim. It remains only to inflate the tires of the bike.
Now you can go to the installation of the rear wheel together with the cassette on the feathers. You can use a wrench for 15, if the mount is a nut. For this work is suitable and universal adjustable wrench. Now it is necessary to install the shifting levers on the handlebars and the derailleurs on the cassette. After that, connect them to the derailleurs with drive cables. It is desirable to foresee the position of cables in advance, so that they do not get tangled in the future. Now it is necessary to put the chain on the low gears and to check the work of the derailleurs. If there is a necessity – adjust. If everything is in order – it is possible to screw on a front wheel.
It is nearing the end – the bicycle brakes remain to be installed. If V-brakes are chosen, the discs are mounted on the wheels before they are put on the bike. The brakes are assembled in the following sequence:
- Installing the levers on the handlebars.
- Mounting the brake housing to the fork and feathers.
- Connecting the clamping mechanism to the levers.
- Installing the brake pads.
- Adjusting the brake tension.
- Calibrating the clearance between the pads and the brake surface.
That’s basically it. That leaves little things like mounting the pedals (remember the location of the left and right), grips, rack and other parts.
Conclusion
Self-assembly of a bicycle from scratch is a fascinating activity that can take a lot of time. It is important not to get hung up on the end result, and to follow a certain sequence of assembly and carefully select the necessary parts and elements. In this case, the interest will not fade, and the final result will be a source of pride to the owner and the envy of others.


