There is probably no other part in the construction of a bicycle that is under so much strain. We are talking about connecting rods. More recently, manufacturers have started using a variety of modern alloys to make them lighter and more durable. To save weight, connecting rods are sometimes hollow. Budget models most often have a non-dismountable unit consisting of connecting rods and sprockets – not the most practical option, because you have to change the entire unit when you repair it.
Today we will talk about how to remove the connecting rods from the bicycle, and when this need arises.
Why do you need to remove the crank rods?
The design of the connecting rods and their direct purpose does not imply anxious maintenance and difficulties with maintenance. The need to replace the part occurs most often after mechanical damage to the element in question. Connecting rods can be removed if you need to get to the bottom bracket or disassemble the entire assembly for lubrication and cleaning.
After a long day of riding in the rain or in puddles, you may get an unpleasant grinding noise that occurs when sand gets on the connection between the shaft and connecting rod. In this case, it will be necessary to disassemble the assembly, clean it and lubricate it.
Important! You can’t just pick up and remove the connecting rod. This requires the dexterity of a magician or a special tool.
The right tool for the job
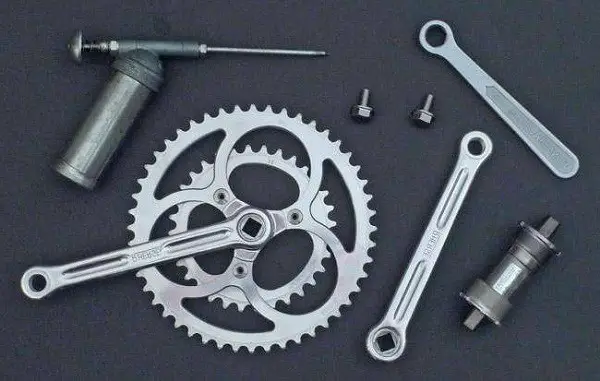
The best option is to use specialized tools, that is, a crank pin puller. It is suitable not only for the dismantling of the part under discussion, but will help remove the carriage and even the pedals, if necessary.
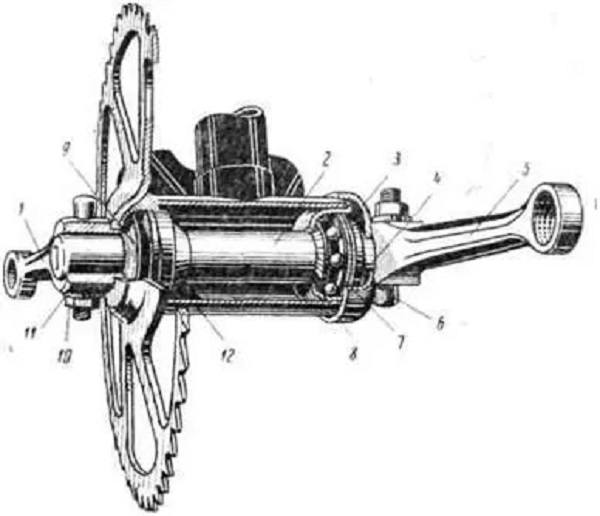
The connecting rod is held in place by a fairly massive bolt with a head size of 8 mm. It is not difficult to unscrew the bolt – even a child can handle it. And then comes the fun part – the connecting rod sits tightly on the shaft with little tension, having a tapered fit. Breaking this tight connection is not easy. The situation gets even worse when debris or moisture gets in – in that case the connecting rod gets stuck to the shaft, and it’s very hard to break that tandem.
Having a puller handy, the situation can be solved with some effort. But what to do if there is no puller handy? An ordinary hammer can help if you have to work with a standard mount like Octalink or square.
Step by step instruction
It is better to stick to the algorithm, so as not to aggravate the situation:
- Unscrew the plug with an ordinary screwdriver.
- Unscrew the bolt that holds the connecting rod on the carriage.
- Spray the mating area between the shaft and connecting rod with WD-40 or regular brake fluid. This will make it easier to detach the parts.
- Important: Make sure that the puller rod is smaller than the diameter of the square shank on which the connecting rod is mounted. Otherwise, your operation will fail – you will simply tear the threads.
- If all is well, screw the extractor into the connecting rod as far as possible, making sure to unscrew the extractor rod.
- Tighten the extractor bolt smoothly with a wrench. As you tighten the screw clockwise, you will see the connecting rod move out of the way.
- Unscrew the tool.
Do not apply too much force – the threads can be damaged by one wrong move. If the elements are stuck to each other, it is better to soak them again in special compounds to facilitate the process of removal.
Removing a connecting rod without a puller
If there are no special tools at hand, use folk wisdom and ingenuity to solve the problem. The procedure is as follows:
- Unscrew the bolts that tighten the lever with the carriage.
- Drive a short distance without parts.
- Tap the connecting rod with a hard, blunt object (a wooden hammer, for example).
In theory, the connecting rod should be easy to remove after that. Some advise warming up the rod-carriage interface with hot water.
Important: Never use a torch – you will damage the mechanism.

There are a couple of other ways to remove the connecting rod without a puller:
- Option one – using a sledgehammer and a dark colored rag. The probability of success is 2%. Using these “accessories”, it is easy to damage the carriage bearings. This, of course, is not fatal, but it is unpleasant if another job is added to the repair.
- Option two – using WD-40. The probability of success is 35%. Thoroughly spritz the attachment point and make a cup of aromatic coffee. As soon as the last sip is taken, go out for a ride with the bolts unscrewed. You need to load the connecting rods as much as possible during the ride. It should work.
- Option three is to use a bolt cutter. The probability of success is 100%. We take a tool and saw over the connecting rod bushing. Then, with a punch and a hammer we send the part to the other world.
- Option four – with the help of an experienced cyclist. The probability of success – 100%. Do nothing, and go to the nearest store with spare parts for bicycles and buy puller.
I must say that this tool comes in handy at home, and not just once. Therefore, it is still worth to buy it, if you prefer to deal with the repair of their own iron horse.
Tips .
In order not to resort to radical methods of removal of the connecting rod, you should periodically lubricate the mounts with bicycle grease. And before performing the discussed task, it is desirable to treat the problem area, in order to loosen the “grip”.
Conclusion
It is possible to remove the connecting rods without a special tool. On this, however, it will take more force and time, and such methods are fraught with the appearance of new problems. Therefore, if you really decided to do the repair yourself – buy the appropriate tool or give a bike in a workshop where there is everything you need for the humane removal of the connecting rod.


